Table of Contents
Features
- Relays new Zabbix alerts (which are generated from Zabbix events) to Spark user(s) and/or room(s).
- Relays Zabbix “all clear” alerts (which are generated when a recovery condition is met) to Spark user(s) and/or room(s).
- Configure Spark message recipients based on a combination of alert
severity, time of day, host group, or other arbitrary criteria. eg:
- Send all alerts to the Spark room “Network Engineers” between 0800-2000 Mon-Fri
- Send alerts with severity “critical” or higher to engineers Joe, Jill, and Mark 24x7, using their Spark accounts “joe@example.com”, “jill@example.com” and “mark@example.com”.
- Immediate notification of alerts. As soon as the bot receives an alert from Zabbix, it is immediately sent to Spark; there is no queueing or batching of messages.
- Interrogate information from Zabbix by issuing commands to the bot on Spark. Eg, “@bot show status”.
- Decentralized: run the bot on the Zabbix server or on a separate server, your choice.
Requirements
System Requirements
- A UNIX-like operating system with a sane
/bin/shshell - Python 3
- Python 2.7 is not supported
- An HTTP daemon
- This document assumes nginx
- A process monitor such as Gaffer/Runit/Supervisor/Upstart
- This document assumes Supervisor
Third-party Software Requirements
- A message broker that is compatible with the Celery
library
- This document assumes RabbitMQ
- The curl command line tool
- The jo command line tool for parsing/building JSON documents
- The Python modules listed in the
requirements.txtfile inside the Zpark program directory- See below for how to install these modules
Network Requirements
The Zpark software requires the following protocols/ports to operate:
-
tcp/443 outbound to the Internet.
There is no official list of Spark IP address ranges so the only reliable way to reach Spark is to not filter outbound access.
-
tcp/80 or tcp/443 outbound to the Zabbix server.
If Zpark and Zabbix are running on the same server, then this communication would be over a loopback interface. Otherwise, this communication is over the network.
-
tcp/80 or tcp/443 or tcp/NN inbound from the Spark cloud.
The TCP port used for inbound communication could be the standard 80 or 443 or it could be an arbitrary port assigned to the Zpark vhost in the web server. This port must be open to the Internet. I know that is scary so there are security mitigations in Zpark to make this less scary. See the
SPARK_WEBHOOK_SECRETconfiguration parameter. -
tcp/80 or tcp/443 or tcp/NN inbound from the Zabbix server.
Again, if Zpark and Zabbix are on the same server, this will be loopback traffic. Otherwise, over the network.
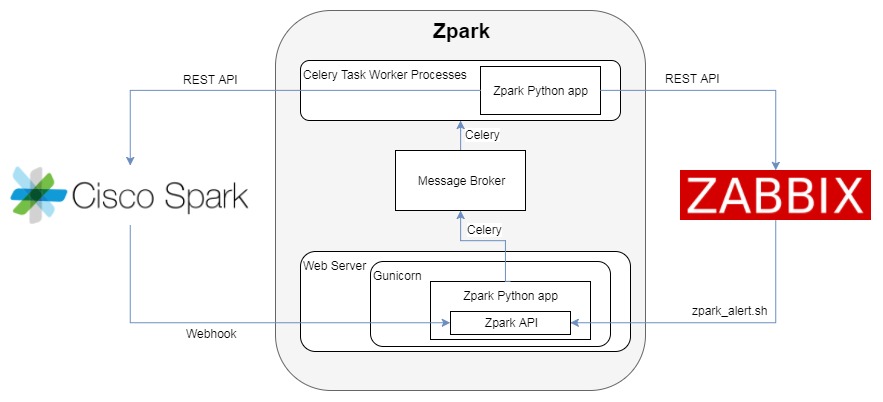
Block Diagram
In order to provide some context to all the detail you’re about to read, here’s an architecture diagram showing how all the pieces fit together.
Installation
The following sections will describe how to install Zpark and get it up and running.
Before beginning, please ensure the system and software requirements above are satisfied by installing all necessary software packages as per whatever method your UNIX-like operating system uses. Instructions for installing the Python modules are below.
Create a Spark User Account and Bot Account
Visit www.ciscospark.com, navigate to the “Sign In” page and create your free account. If you already have a Spark account, go ahead and log in.
Once you’ve logged into your account (using the browser, not the desktop app), visit developer.ciscospark.com, and navigate to the “My Apps” tab. Click the “+” button and choose to create a bot. Give your bot a display name, a username, and provide a URL to the icon that will be used for your bot’s avatar.
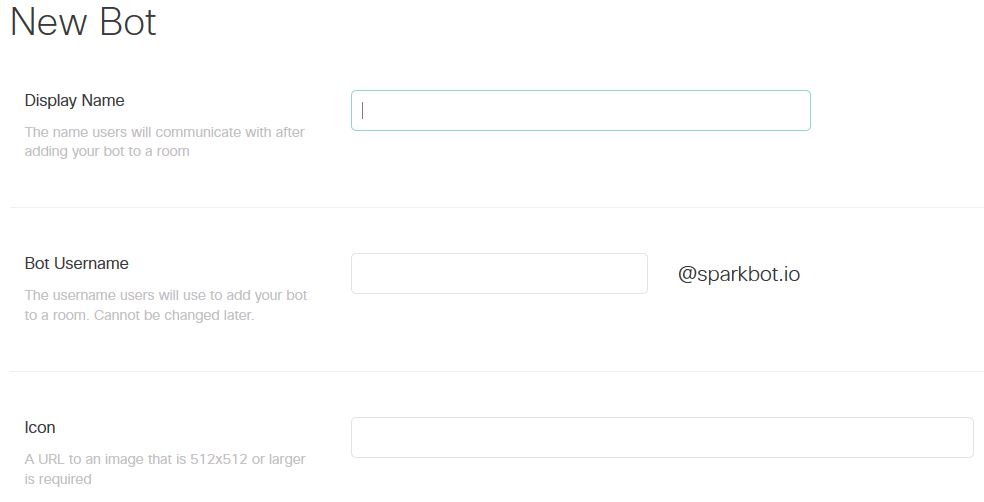
Carefully copy the access token that is generated for your bot. You will need this token in the next step.
Download and Configure Zpark
This is optional but highly recommended: create a dedicated, non-privileged user account to run the bot. This account need only exist on the server where you will be running the bot. The rest of the documentation will assume the following user exists:
- Username:
_zpark - Groups:
_zpark - Home:
/home/zpark
As the _zpark user, clone the Zpark git repo into /home/zpark:
% cd /home/zpark
% git clone https://github.com/knightjoel/zpark.git
If you aren’t a git user or don’t have git installed, you can also download the latest release.
This is optional but highly recommended: use the Python virtualenv tool to create an isolated Python environment for Zpark. And since you’re at it, you might as well use the virtualenvwrapper tools to make managing your isolated Python environments a bit easier:
% pip install --user virtualenvwrapper
% mkdir ~/venvs
% export VIRTUALENVWRAPPER_PYTHON="/usr/local/bin/python3.6"
% export VIRTUALENVWRAPPER_VIRTUALENV=/usr/local/bin/virtualenv-3
% export WORKON_HOME="$HOME/venvs"
% source ~/.local/bin/virtualenvwrapper.sh
% mkvirtualenv zpark
You may need to adjust the above paths to suit your operating system.
Now install the required Python packages. If you’re using an isolated Python environment, make sure you activate the environment first.
% workon zpark        # activate your venvironment
% cd ~/zpark
% pip install -r requirements.txt
Configure Zpark by copying the default config file to app.cfg and then
modifying it. The app.cfg file must be located in the top-level zpark
directory.
% cd /home/zpark/zpark
% cp zpark/default_settings.py app.cfg
The app.cfg file is parsed as Python code so Python syntax must be
applied!
The following settings must be configured:
-
ZPARK_API_TOKENZpark API token
This token is used by consumers of the Zpark API. If a script attempts to use the Zpark API without passing the correct token, the request will be rejected with an HTTP 401 error code. The token should be generated as a random string:
openssl rand -hex 16Example:
ZPARK_API_TOKEN = "e0c297f5....5l2j2" -
SPARK_ACCESS_TOKENSpark API access token
This token is used by Zpark to authenticate itself to the Spark service. Copy and paste the access token that was automatically generated when you created your bot account on developer.ciscospark.com.
Example:
SPARK_ACCESS_TOKEN = "thisismyautogeneratedsparktoken" -
SPARK_WEBHOOK_SECRETSpark webhook secret
This is a secret value that is used to authenticate incoming Spark webhook callbacks. It’s used to ensure that someone cannot impersonate the Spark service and cause Zpark to take some unauthorized action which sends information back to the unauthorized user. The secret should be generated as a random string:
openssl rand -hex 16Example:
ZPARK_API_TOKEN = "40fj43l4....940l1" -
CELERY_BROKER_URLCelery message broker URL
This is the fully-qualified URL (including username and password) that Celery will use to communicate with whatever message broker you’ve chosen. Refer to the Celery documentation for details on the URL syntax for your broker.
Example (for RabbitMQ):
CELERY_BROKER_URL = 'amqp://user:pass@hostname/vhost' -
ZABBIX_SERVER_URLFully-qualified URL to Zabbix
This is the full URL to the Zabbix server. Must include the scheme (
httporhttps), the domain/IP address, the port (if not 80 or 443) and the directory if applicable.Example:
ZABBIX_SERVER_URL = http://zabbix.your.domain/zabbix -
ZABBIX_USERNAMEZabbix account username
The username for an account with access to the Zabbix API. This is the account that Zpark will use to communicate with Zabbix.
-
ZABBIX_PASSWORDZabbix account password
The password for the Zabbix account.
-
ZPARK_SERVER_URLFully-qualified URL to Zpark
This is the full URL for Zpark itself. This URL – which is a byproduct of how the web server (nginx) is configured – is what Spark will use to access the Zpark API. The URL must include the scheme (
httporhttps), the domain/IP address, port (if not 80 or 443) and the directory if applicable.Example:
ZPARK_SERVER_URL = https://www.your.domain/zpark -
SPARK_TRUSTED_USERSList of trusted Spark users
This is a (Python) list of Spark users that are allowed to send commands to the Zpark bot. Commands received from users not in this list are silently ignored. By default, the list is configured to deny all users. Users must be identified by the email address associated with their Cisco Spark account.
Example:
SPARK_TRUSTED_USERS = [‘joel@example.net’, ‘knight@example.com’]
The Zpark bot is now configured!
Configure RabbitMQ
RabbitMQ needs some basic configuration so that Zpark can successfully submit and retrieve tasks. The example below is based on the example in the Celery documentation. Each line below is a command that must be run as a user with administrative privilege in RabbitMQ.
Create a RabbitMQ account and assign it a password:
# rabbitmqctl add_user zpark <password>
Create a RabbitMQ virtual host for Zpark:
# rabbitmqctl add_vhost zpark
Grant the zpark user full permissions on the vhost:
# rabbitmqctl set_permissions -p zpark zpark ".*" ".*" ".*"
Take note: The username, password and vhost you choose here will become
part of the CELERY_BROKER_URL config parameter.
Configure Gunicorn and nginx
The Zpark bot is implemented as a web service that provides an API and therefore requires an HTTP daemon in order to function. Gunicorn is used to run the actual application code and nginx (or your HTTP daemon of choice) is used to provide flow control, SSL/TLS, access control, and so on. The nginx daemon will receive incoming requests from clients and proxy them to the Gunicorn daemon where the Zpark application is running.
Configure Gunicorn by copying the template config and modifing it as needed. If you’re following this guide as-is, the file shouldn’t require much, if any, modification:
% cd /home/zpark/zpark
% cp gunicorn.conf.py.template gunicorn.conf.py
% $EDITOR gunicorn.conf.py
Add Gunicorn to your process monitor (which this document assumes is Supervisor). Add the following to Supervisor’s configuration making sure to modify it to suit the filesystem paths you’ve been using so far:
[program:zpark]
command=/home/zpark/venvs/zpark/bin/gunicorn zpark:app -c /home/zpark/zpark/gunicorn.conf.py
directory=/home/zpark/zpark
user=root
autostart=true
autorestart=true
Reload the Supervisor config and Gunicorn/Zpark should now be running:
# supervisorctl reread
# ps -axo pid,command | grep zpark
68972 /home/zpark/venvs/zpark/bin/python3.6 /home/zpark/venvs/zpark/bin/gunicorn zpark:app -c /home/zpark/zpark/gunicorn.conf.py
80720 /home/zpark/venvs/zpark/bin/python3.6 /home/zpark/venvs/zpark/bin/gunicorn zpark:app -c /home/zpark/zpark/gunicorn.conf.py
Use the nginx config snippet below to either: build a new server
config block or add a new location block to an existing server. This
config is not enough on its own to fully configure nginx; you will need
to integrate this example into your fully built nginx.conf. Since
you’re looking at nginx.conf anyways, I recommend you read the
Pitfalls and Common
Mistakes
guidance document in order to ensure your configuration is following best
practice.
[...]
location /zpark {
    proxy_set_header X-Forwarded-For $proxy_add_x_forwarded_for;
    proxy_set_header X-Forwarded-Proto $scheme;
    proxy_set_header Host $host;
    proxy_redirect off;
    proxy_pass http://zpark.app;
}
[...]
upstream zpark.app {
	server unix:/tmp/gunicorn.zpark.sock fail_timeout=0;
}
[...]
(Re)start nginx and ensure there are no errors. You should now be able
to browse to the /zpark/api/v1/ping URL (or just /api/v1/ping if you
are running Zpark at the top level of the nginx vhost) and receive a message
indicating you didn’t provide the correct credentials
(with an HTTP status code 401) in JSON format. If you see such a message,
then nginx, Gunicorn, and Supervisor are all working correctly!
If you recieve a “Bad Gateway (502)” error, ensure that Gunicorn is running and
that both Gunicorn and nginx are using the same fully qualified path to the
.sock file.
Install the Alert Script on the Zabbix Server
Zabbix cannot natively talk to the Zpark bot’s API but Zabbix can be configured to run a shell script in response to an alert and the script can then talk to the Zpark API.
Copy the zpark_alert.sh script to the Zabbix server and put it in the
directory that is configured as the Zabbix AlertScriptsPath.
# grep AlertScriptsPath /etc/zabbix/zabbix_server.conf
AlertScriptsPath=/etc/zabbix/scripts/
# cp /home/zpark/zpark/zpark_alert.sh /etc/zabbix/scripts
Make sure that the script has read and execute permissions for the user that the Zabbix server process runs as.
# chown _zabbix /etc/zabbix/scripts/zpark_alert.sh
# chmod 500 /etc/zabbix/scripts/zpark_alert.sh
Edit the zpark_alert.sh file and set the following variables:
-
zpark_urlThe URL that Zabbix will use to reach the Zpark API.
The fully qualified URL to your Zpark bot. This will be highly dependent on how you configured nginx. Include the scheme (
httporhttps), the FQDN (www.domain.local) and the URI (/zpark).This URL needs to be reachable from the Zabbix server and can be different than the
ZPARK_SERVER_URLconfig parameter if you’re actively using different URLs for external vs internal communication to Zpark.Example:
zpark_url="https://www.your.domain/zpark" -
zpark_api_tokenThe Zpark API token.
Copy and paste the value of the
ZPARK_API_TOKENsetting from theapp.cfgfile.Example:
zpark_api_token="e0c297f5....5l2j2"
Configure Zabbix
Now configure Zabbix to utilize the alert script in order to send alerts to Zpark.
Create a new media type by logging into the Zabbix web UI and navigating
to Administration > Media types. Create a new media type named Zpark
with the following settings:
- Type:
Script - Script name:
zpark_alert.sh - Script parameters:
{ALERT.SENDTO}{ALERT.SUBJECT}{ALERT.MESSAGE}
- Enabled: checked
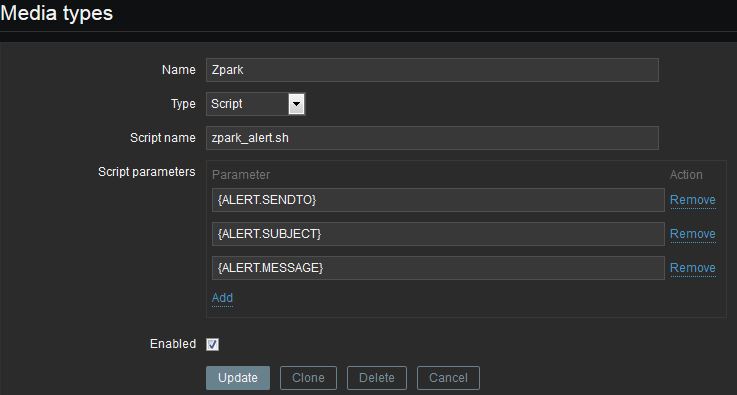
It’s important the the media settings be entered exactly as shown and in the order that’s shown.
Create a Zabbix user account which will represent a Spark user and will define things like the notification schedule for the Spark user and severity level(s) the user should be notified about. Alternatively, if you already have a Zabbix user account that you want to add Spark notifications to, just skip the part about adding a new account and jump to the part about adding new media to the user.
If you want Zpark notifications to be sent to a Spark room, still go ahead and create a Zabbix user per the instructions below. Since Zabbix sends alerts to its “users”, you’ll have to create a user to represent the Spark room.
If you want Zpark notifications to be sent to multiple users, multiple rooms, or a combination of both, create 1 Zabbix user for each user/room.
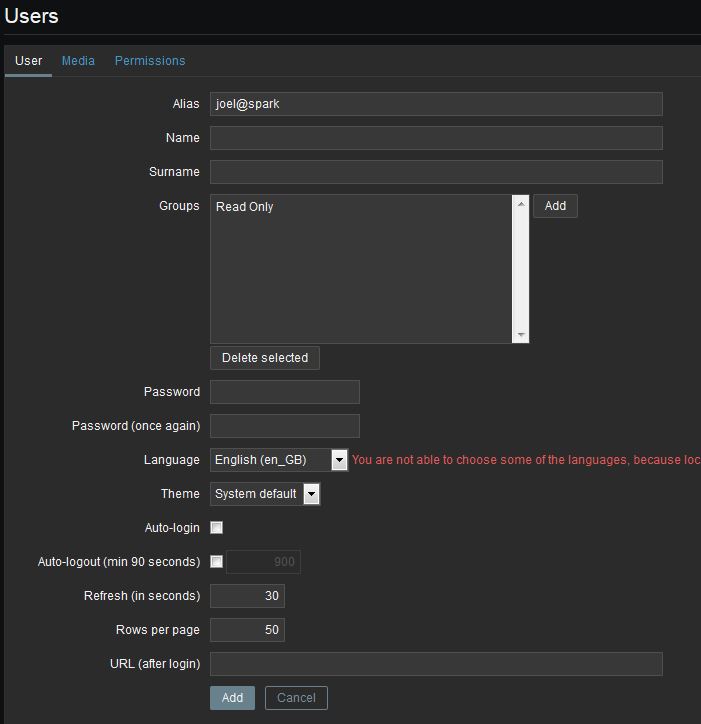
Create the Zabbix user by navigating to Administration > Users. Choose
to “create user” and add them to the appropriate group(s). If this
account is for notification only and not meant to be a login account to
Zabbix, add the account to the Read Only group and nothing more. Also
ensure Auto-login is off and set a password on the account.
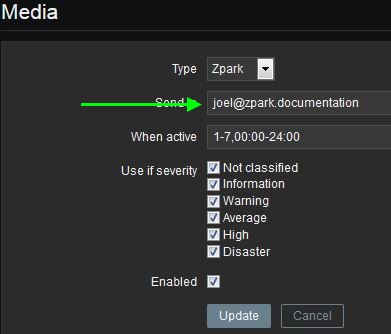
Click over to the Media tab and click Add (inside the Media box,
not on the button). Choose Zpark in the dropdown and then set the Send
to field to the email address that your user uses to sign into their Cisco
Spark account. It’s important this field is correct otherwise the user
will not receive any messages.
To setup notifications to a Spark room, you need to fill the Send to
field with the unique roomId for the room. The roomId isn’t exposed
in the Spark client, so follow these steps to retrieve it:
- In your Spark client, add your Zpark bot to the room that you want to receive notifications in.
-
Go to the CLI on the server where Zpark is running and execute the
show_spark_rooms.pyscript:% workon zpark # activate your venvironment % cd /home/zpark/zpark % python cli/show_spark_rooms.py Zpark has been invited to the following Spark rooms: "My Zpark Room" roomId: Y2lz...... - Copy and paste the
roomIdvalue into theSend tofield in the Zabbix UI. - Create a new Zabbix user and repeat steps 1-3 for each room that you want to receive notifications in.
When you’ve finished with the email address or room ID for the user, you may optionally modify the schedule and severity information.
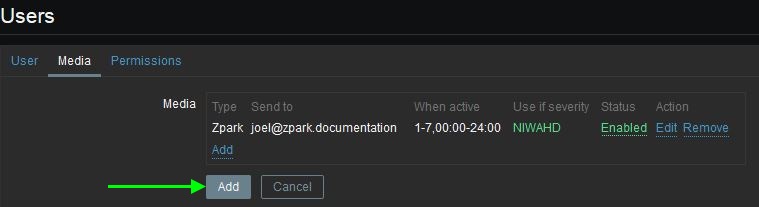
When finished with the media, click Add and then click the Add
button back on the Media tab.
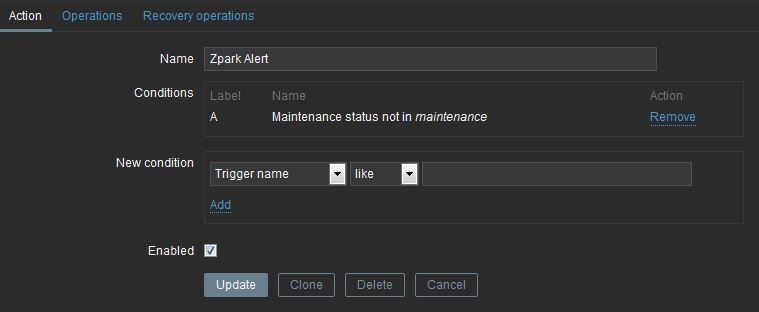
Lastly, configure a new action by browsing to Configuration > Actions and clicking on the “Create action” button. Fill out the action as follows:
- Name:
Zpark Alert - Conditions: Leave at default
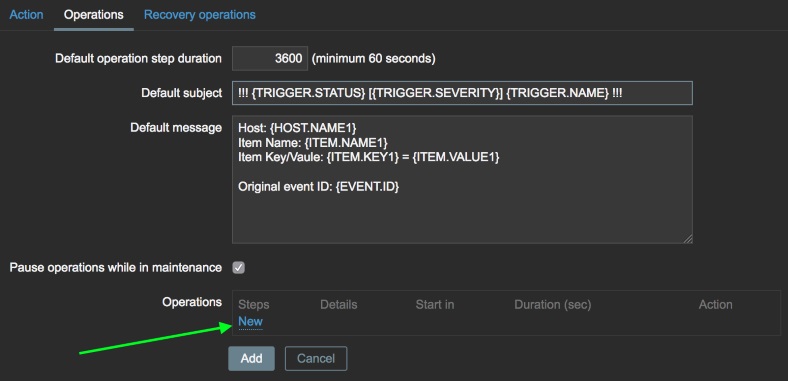
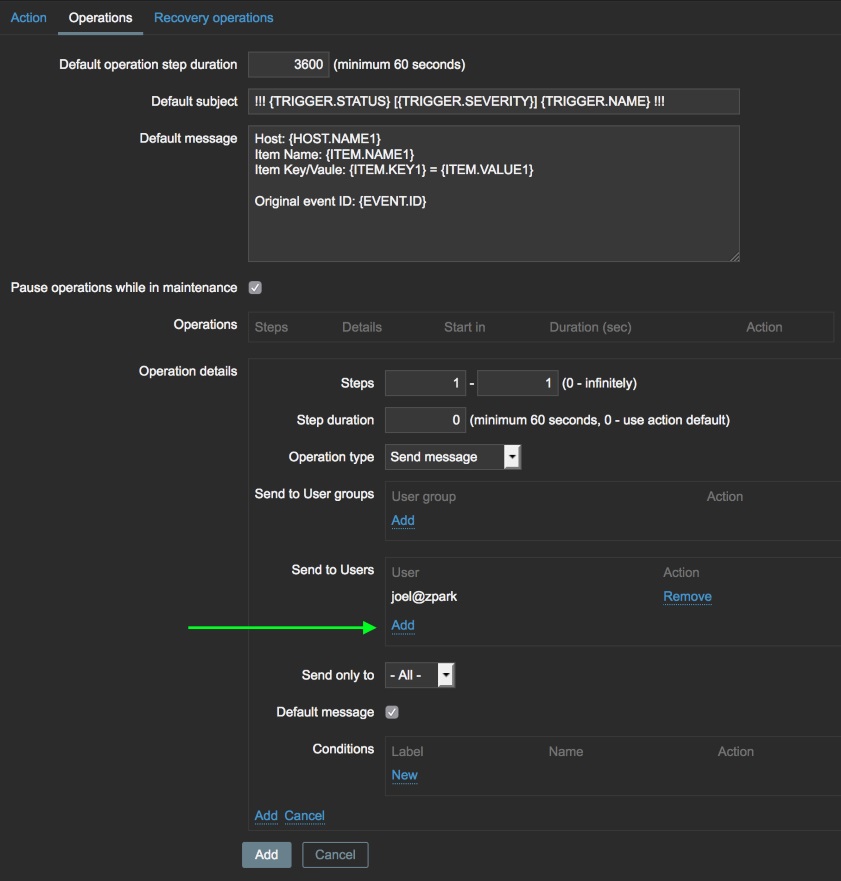
On the operations tab, modify the Default subject and Default
message settings as you see fit. Most importantly though, click the
New link in the “Operations” box.
Click the Add link in the “Send to Users” box and select the Zabbix
user you created earlier. All of the other operational detail options
can be left at defaults. Click the Add link once again to add the
operation to the alert.
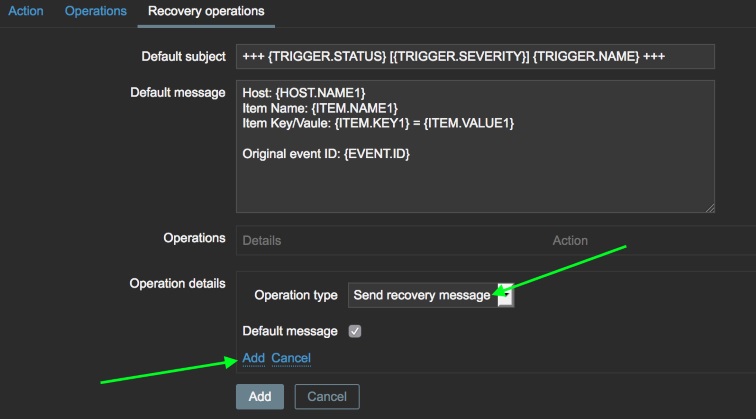
Click over to the “Recovery operations” tab and click the New link in
the “Operations” box. In the Operation type drop-down, select Send
recovery message. Click the Add link once again to add the operation
to the alert.
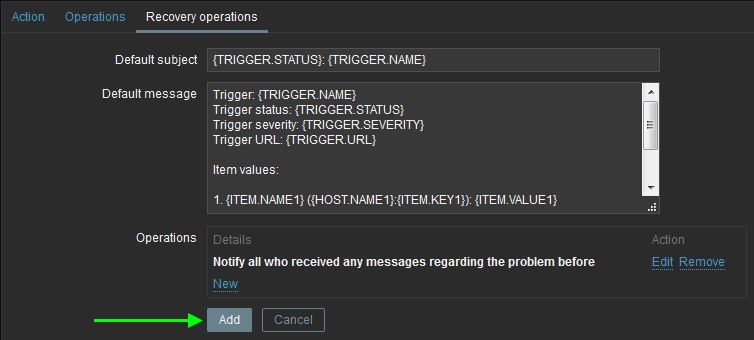
Save the action by clicking on the Add button. The Zpark Alert
action should now be shown in the list of system actions.
For information on how alerts and actions can be customized, check out the sections in the Zabbix manual that deal with events and notifications upon events.
Create Spark Webhooks
A webhook is what Spark uses to notify Zpark that a command has been issued. A webhook is just an HTTP POST that’s sent to Zpark that contains information such as what the command was, who sent it, etc. If a webhook is not configured, Zpark will not be able to respond to any commands issued by Spark users.
There is a CLI script that comes with Zpark that will create a webhook.
You can run this script as the _zpark user:
% workon zpark        # activate your venvironment
% cd /home/zpark/zpark/cli
% python create_spark_webhook.py
The details of the new webhook will be displayed but that’s for informational purposes only; you needn’t record or do anything with that information.
The webhook will be configured to use the URL stored in the
ZPARK_SERVER_URL configuration setting which is why it’s important to
ensure the accuracy of this setting.
There are additional scripts in the cli directory to show all configured
webhooks (show_spark_webhooks.py) and delete a webhook
(delete_spark_webhook.py).
Test Notifications
If everything has gone well up to this point, you’re ready to test! Before you start:
- Make sure that Gunicorn is running
- Make sure that nginx is running and has loaded your updated nginx.conf that includes the configuration for Zpark
- Log into your Cisco Spark account using either the web interface, desktop app or mobile app
In order to complete the test, you need to trigger an alert in Zabbix. You can do this using one of these methods:
- Performing an action that will cause one of your already-configured
triggers to fire. This could be something safe like stopping the
zabbix_agentprocess on a server for more than 5 minutes. - Importing the Zabbix template below and using it for a simple, non-impactful alert test.
If you chose to use an already configured trigger, go ahead and trip it. You should shortly receive a new direct message in your Spark client from the Zpark bot informing you of the alert.
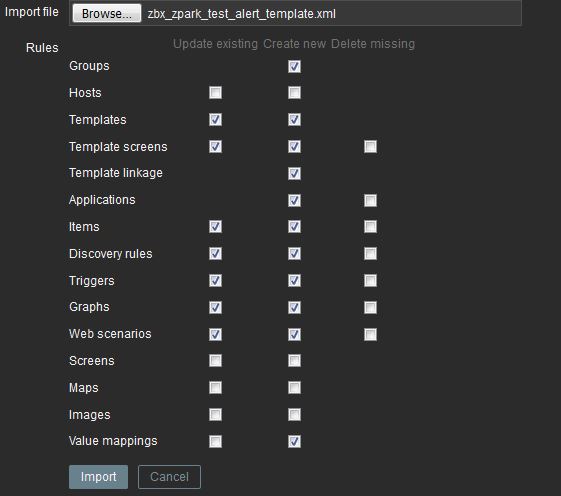
If you wish to use the testing trigger, download the
zbx_zpark_test_alert_template.xml
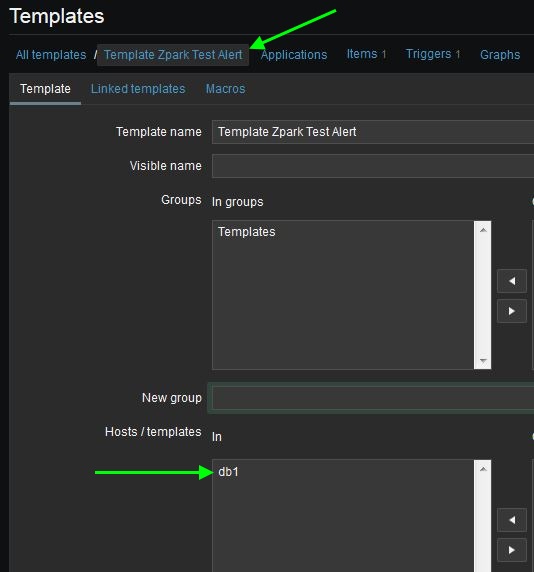
file and import it into Zabbix on the Configuration > Templates screen.
A new template called Template Zpark Test Alert will be created.
Edit the template and assign a UNIX machine to the template.
In order to trigger the test alert, log into the server and create a
file named /tmp/zparktest. Within 30 seconds an alarm will be raised
and shortly after that you should receive a new direct message from the
Zpark bot informing you of the alarm. Delete the /tmp/zparktest file
and the bot will soon notify you that the alarm has cleared.
Test Bot Commands
Test that Zpark will respond to your commands by starting a 1-on-1 Spark
conversation with the bot and issuing a command such as show status. Zpark
should respond within a few seconds with some Zabbix status information.
Repeat the test but this time in a multi-person Spark space. Make sure you remember to “at-mention” the bot this time: the Spark security architecture requires that bots be “at-mentioned” otherwise the bot will not “see” the command. Example:
@zparkbot show status
Wrong:
show status
zparkbot show status
@zparkbot, show status
@zparkbot: show status
Troubleshooting: If the 1-on-1 room test doesn’t work:
- Verify your nginx settings are correct as per the instructions above
- Verify that you’ve created a webhook with Spark and that it’s
pointing to the correct address for your Zpark vhost in nginx (use
the
show_spark_webhooks.pyCLI script) - Verify that the Zpark vhost in nginx is reachable from the Internet; verify necessary firewall policies are in place
- Check the nginx access log: ensure you can see the Spark service making requests to the Zpark vhost
- Check the nginx error log
If the 1-on-1 room test works but the multi-person room does not:
- Verify you’re properly “at-mentioning” the bot (see the examples above)
- Check the nginx error log
- The problem is almost certainly in how you’re communicating with the bot and not something on the server since the 1-on-1 test was successful
Zpark Commands
This is a list of commands that Zpark supports:
-
show issuesShow the list of active Zabbix issues, the same as what’s displayed on the Zabbix web dashboard.
-
show statusShow Zabbix status, including number of hosts, items, and triggers, the same as what’s displayed on the Zabbix web dashboard.